Brake Performance Kit for ClubSport Pedals V3 is now available

edited November 2016 in Blog

image

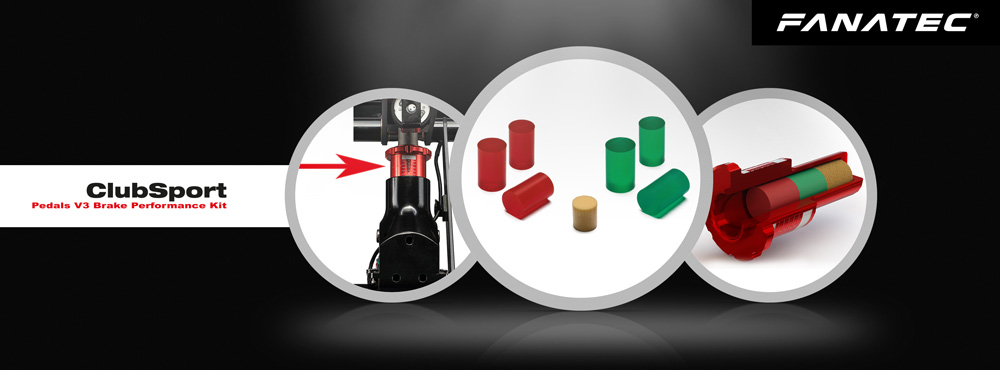
We were finally able to ship the Brake Performance Kit for our ClubSport Pedals V3.

It makes your pedals more stiff than the stiffest settings you can reach with your PU foams and also allow a different feeling as you can combine PU foam and Elastomer springs for some travel in the beginning and then super stiff resistance for braking. This emulates a race car brake like you find in F1 or LMP. you will brake using only muscle memory instead of memorizing the foot position and this can make you faster.

This kit is not there to replace the damper kit as the damper will add hydraulic feel to it. And it is also not designed to fix any issues some customers had with the smoothness of their V3 brake in the first batches. Those customers should contact support and get a free PU foam with better lubrication which will not need service.

The Brake Performance Kit contains 4 different types of elastomer springs and a small PU foam which will allow different spring settings. Green is harder than red and both colours come in two diameters and the bigger the diameter the stiffer the pedal.

Please note that there is a reason why we did not ship the CSP V3 with the BPK as standard equipment as you will see that the adjustment of the travel and stiffness cannot be made with the pre-load screw anymore.

Let us know how you like the feeling of your modified brake pedal and what colour combo you use.
«1

Comments

  • Natalie BNatalie B Member, Moderator, Betatester
    I'll be placing an order on the 25th (along with my HB in the sale) to save on delivery :wink: I'm really excited to try the finished product out, the feedback has been great so far and it should be a fantastic upgrade to the CSP! What a fantastic end to the year, the CSL, the Black Friday sale and now the BPK! What an incredible year it's been, well done to you and the entire team. :smile:
  • can we use new kit with csp v2 brake pedal (instead of old pu foam)?? what is the diameter of csp v2 brake arm hole, i thinkit is 12or 13mm?
    thanks
  • Joseph GossenJoseph Gossen Member, Moderator
    Was excited to order these however the shipping is the same cost as the item. Why so expensive Thomas?
  • Joseph GossenJoseph Gossen Member, Moderator
    Went from Available to no date? 
  • when is the product available???
  • How many springs can you put in does four give shorter travel?
  • Joseph GossenJoseph Gossen Member, Moderator
    Ordered and waiting  :)

    @Jamie from the Beta test I could use PU + 2 Eladurs cut to fit however the final release looks to have shorter Eladurs and based on the images you can put 2Eladurs +1 PU foam.
  • I wonder if you could leave out the pu foam and have room for 3 eladurs...
    I expect the foam and 2 eladurs will provide a good feel anyway.
    I was going to order this with a black Friday deal to save on shipping, but now it looks like it changed to preorder.
  • Wow, this is a nice improvement over the beta test Eladurs! :)
    I am using actually the combo: 13mm Green at the end, 12 mm red in the middle and the PU foam on first so that the braking is soft in the beginning and is going harder to the end.
    But I dont know the quick guide.. It tells me to put in the PU foam FIRST.. Now I did it exactly the other way and put in the hard green Eladur first and the PU foam ahead of the 2 Eladurs..
    Is it a MUST to put the PU foam at the end/first into the preload screw?
  • For me, it is a clear step forward. Personally, I need a pedal that is not so stiff. I have used the small PU foam in first position, then the 12mm red Eladur and at last the red 13mm Eladur. So the feeling was very good but I needed too much force to build 100% brake pressure. Therefore, I also reduced the load cell from '70' to '40'. Now, the feeling for the brake was absolutly perfect.

    The pedal can very easily activated, then it will very quickly harder with a distinct pressure point at 100% brake pressure. At full pressure the pedal feels more elastic with a quicker response, which allows me to reduce the pressure at the entrance of a corner more precisely. Good work Fanatec.
  • Ok guys I went for the very hard option PU foam plus two green Q13, love the upgrade but for me I would not mind a little harded.
  • Ok guys I went for the very hard option PU foam plus two green Q13, love the upgrade but for me I would not mind a little harded.
    You can take out the PU foam and use only the elastomer springs.
  • Feels so much better than the "treading on snow " feeling I was getting before,thanks Thomas. I have the 13mm green then the 13 mm red then the pu ,it's a very good brake feel but I may try it without the pu foam at a later stage. Keep it up Fanatec!! I can't get enough of your equipment. #Simraci
  • Nice kit. I have pu, 13mm red, then 13mm green, along with my damper kit.  Seemed almost too firm at first, but after a couple hours driving I'm getting tuned into the new setup.  I think this is just right for me. Firm, with enough travel that the damper still adds to the feel. 
  • Natalie BNatalie B Member, Moderator, Betatester
    I've been testing my BPK and agree that the feeling is superb. I'm particularly happy with the foam + red 12 / green 13 ... this gives me plenty travel, a lovely progressive feel and the ability to hold the pedal steady at almost any point in the range.
  • Joseph GossenJoseph Gossen Member, Moderator
    Received my kit and I have to agree with Natalie. Loving the PU+12R+13G combo. I might swap the 12R for the 13R for a bit more stiffness but nice final product !
  • Received my kit almost 2 weeks ago and absolutely love it.
    Using R13+G13+PU and the v.3 damper kit, really makes a difference with the 3 different feelings when braking from 0 to 100%, so getting much better lap-times in RR3 since it is easier for me to remember muscle pressure than foot angle position. 
    It does not matter in which order they are put into the cylinder, the softest material will always apply first and the stiffest as last, simple physics.

    I had to wait a few days before I installed the kit though, since I was waiting for a damper replacement from FANATEC, thank you for quick and professional support, the new damper works flawless. :)

  • The small allen screw that releases the bolt securing the brake will not budge. It's in there so tight, that I'm going to strip the head trying to get it out, already starting to grind the interior hex down and losing the ability to get a secure fit for the allen wrench. 

    What am I supposed to do now? I've tried WD-40 on the allen screw and everything. It was just secured too tightly. This is the third allen screen that's I've come across that was secured to tightly at the factory. Two of the brake plat screws were also fastened so tight, I couldn't get them off without damaging the hex head. I had to remove them with a drill bit for pulling stripped screws, but this brake screw is in a spot that I don't think I can drill out. Nor do I want to lose that particular screws as it's very small and made for that spot. 

    I don't understand how I'm supposed to make this upgrade. I feel like I just wasted my money on the brake kit. :(
  • Joseph GossenJoseph Gossen Member, Moderator
    The small allen screw that releases the bolt securing the brake will not budge. It's in there so tight, that I'm going to strip the head trying to get it out, already starting to grind the interior hex down and losing the ability to get a secure fit for the allen wrench. 

    What am I supposed to do now? I've tried WD-40 on the allen screw and everything. It was just secured too tightly. This is the third allen screen that's I've come across that was secured to tightly at the factory. Two of the brake plat screws were also fastened so tight, I couldn't get them off without damaging the hex head. I had to remove them with a drill bit for pulling stripped screws, but this brake screw is in a spot that I don't think I can drill out. Nor do I want to lose that particular screws as it's very small and made for that spot. 

    I don't understand how I'm supposed to make this upgrade. I feel like I just wasted my money on the brake kit. :(
    Hey Andre,

    It is in there quite snug but it will give with a bit of pressure. You are referring to the Allen screw and not the metal rod correct? The metal rod is also in quite tight but needs a good push to come loose. Once I got the connection loose I turned the head around so the Allen key is on top and easier to access. Plus I did not screw it on tight at all just enough to hold the rod in place. It is a bit nerve racking because it feels like it is going to snap but you should be ok.
  • Fanatec should put a warning to be careful for the thin wire going to the vibration motor which passes behind the metal rod. I snapped mine while installing the mod :/
  • Would these be used/helpful if you also have the hydraulic damper installed?
  • I've been testing my BPK and agree that the feeling is superb. I'm particularly happy with the foam + red 12 / green 13 ... this gives me plenty travel, a lovely progressive feel and the ability to hold the pedal steady at almost any point in the range.
    Thanks for sharing the setup, I will try that combo first. Can anyone recommend the settings on the damper kit combined? Perhaps on the lightest "1" setting is enough? Thanks in advance !!
  • I have mine set up with PU first followed by 13G and 13R it feels fantastic. I did have an issue with one of the titles I play where telemetry showed about 5% brake without the pedal being engaged, at first I set inside deadzone to get it back to 0% which worked fine but not what I really wanted so I removed the 13R and cut about 1/8" off reinstalled and it works perfect know.
  • Joseph GossenJoseph Gossen Member, Moderator
    I started having the same issue with constant brake being applied. Tried first turning up dead zone (wanted full range so back to 0) then I turn the brake adjustment all the way down and that only worked for a short time. Finally I found that removing the PU foam solved it since that was making the length of the 2 eladurs and foam too long in the cylinder. I was also getting s gritty feel again from the PU foam even with using the lube. Works smooth now with no constant brake. Wish I could keep using the foam but those two issues don't make for the best experience.
  • Is it compatible with the CSP V1 ?
  • Joseph GossenJoseph Gossen Member, Moderator
    Just and update regarding my previous post on removing the PU Foam. I have tried placing the PU foam between the red and green eladurs and so far is working amazing. No gritty feel, smooth transitions, enough travel with good resistance. 
  • Joseph GossenJoseph Gossen Member, Moderator
    Is it compatible with the CSP V1 ?
    Hi Simon,

    Sorry the performance kit is not compatible with the V1 pedals.
  • Just and update regarding my previous post on removing the PU Foam. I have tried placing the PU foam between the red and green eladurs and so far is working amazing. No gritty feel, smooth transitions, enough travel with good resistance. 
    Did you clean the cylinder properly the first time you installed the kit?
    It should not matter in which order you install the foam.
    Could also be that you it didn't get in straight the first time, I don't have any gritty feel nor constant brake, basically just dropped them in like shown in the announcement picture, but cleaned the cylinder and gave everything a good amount of grease. 
  • Kuan Ming Chen said:

    Thanks for sharing the setup, I will try that combo first. Can anyone recommend the settings on the damper kit combined? Perhaps on the lightest "1" setting is enough? Thanks in advance !!
    1 is enough, while 2 makes the top end slightly harder it tends to be unreliable.
    So I would recommend to keep it at 1 for precision and adjust the hardness with the springs, a damper kit on top helps too.
    Thanks for the sharing, Jorg.

    Yes I am currently running with damper settings at 1, and seems to be a good setting yet still feel that hydraulic damper effects.

    Thanks :)
Sign In or Register to comment.